Fingernails and the art of painting them
Long nails have always been a part of my life. I like many others see them as glamorous and lady-like especially when painted up beautifully. When I was hairdressing I went the extra mile and got acrylic nails put on, what with all the dipping of hands in water all day long meant my nails became weak and broke a lot more often. T helped a lot that the extra strength of these acrylic extensions meant that I could use them as a rake to blow-dry and fluff up hair styles so it was a win win situation.
Unfortunately over the years I have become allergic to the acrylic and nail glues so I can’t wear those anymore so it’s kind of lucky I am no longer a hairdresser in that I don’t really need them. The only downside is that every time I have a nail break down past the quik I am forced to choose between sore swollen puffy fingers if I use nail glue or a painful tearing off of the broken nail, not pleasant either of those choices.
So it’s with trepidation I have come to the scary decision of cutting my nails short, like the 1940s cigarette holders, I don’t really need them (I don’t smoke so doubly don’t need those!) anyway you can imagine how pleased I was to see some top models and glamorous ladies in the glossy mags who wear their nails short and they still look amazing because of the ….wait for it….nail art!
So lets have a wee look at the type of art you can do your finger nails and I guess toenails shouldn’t miss out either as they look equally nice with a coat of pretty polish and some diamantes or designs on them.
While very detailed nail art is best left to professionals, there are a number of techniques that you can do in your own home. With a little practice and a lot of patience, you, too, can create beautiful, unique designs to brighten up your nails.
Here’s how-
First up, make sure your nails are in good shape, not bitten or half broken. You don't need a manicure to start creating nail art, but you do need to make sure that your nails are clean and shaped well enough that they look even. Also make sure that your cuticles are nice and healthy.
Products - There are a multitude of different paints and polishes available for nail art, and your choice of products is completely up to you. Experiment with a few different brands and types of polish or paint to see which you like best, and don’t forget to give acrylic craft paints a try, these work great and are a whole lot cheaper than nail paints or polish. You’ll also be able to choose from a variety of implements to help you apply your paint.
You can buy professional-grade nail art kits that include all the brushes, strippers, and marbling tools you’ll need, or you can improvise. A toothpick or bobby pin, for example, can help you apply dots and swirl colours with precision, while thin-tipped detail brushes available at your local arts or hobby store can work just as well as special nail art brushes. Perhaps most importantly, though, make sure you have pure acetone for quickly removing mistakes, and have a small brush and / or Q-Tips available solely for applying the acetone.
Start with a base coat. Before you begin your nail art you need to create your canvas. Depending on the look you’re going for, you can paint your nails a neutral colour, such as clear, white, pale beige or pink, or you can paint them any other colour you desire. You may also wish to divide the nail into two or three different colours. Do two coats, as it strengthens the nail and gives a better finish. Make sure your nails are neat and even, and allow them to dry thoroughly before proceeding.
Roll your brush or other tool in one colour of paint to make sure the paint adequately and evenly covers it. If your brush has globs, excess paint, or not enough paint, you’re going to have trouble painting. Keep your art simple. There’s plenty of room for creativity—you can create pictures, abstract designs, etc. to your heart’s content—but don’t make your nails look too busy. Simple designs are often the most beautiful, and if you’re a beginner your chances of success are far greater the simpler your art is.
Finish with a clear top coat. Once all your nail art is dry, paint over it with a clear protective acrylic top coat to seal and protect your nail and your hard work.
You should reapply a clear top coat every two or three days to protect your art and to keep your nails looking shiny, and apply cuticle oil daily. Treat your nails with care—wear gloves when gardening or doing other work that involves your hands.
Use things like a toothpick to swirl two colours together if you want a blended look, make sure both colours are dotted on quickly then swirl before they get a chance to dry.
Water Marbling
Fill a shallow, wide-mouthed cup or bowl to about 90% full with water. Then add the desired colours of paint to the water. Have your paints open and ready to go, as they will harden quickly on the surface of the water. Drop a drop or two of the colours you want to use on top of the water. A high-quality nail polish works best for this method. Create the marbled design in the water. Repeatedly drag a pin or toothpick through the surface. Use a cotton swab to remove the excess polish from the surface while your nail is still submerged in the water. Remove nail from water and use a cotton swab (with acetone if necessary), to clean up the edges and remove polish from the finger.
You can also apply stickers and jewels like diamantes to your nails for a glamorous look. Use tweezers or a special applicator to dip small jewel or sticker into a drop of nail gel or nail glue. You can buy specially-made jewels and stickers from nail art supply stores, or you can use your own—just make sure they are small and have flat bottoms. Don’t forget to cover the nail and jewel with a clear gloss top coat.
Glitter can be applied in several different ways
Mix glitter with nail gel or paint. Dip brush into mixture and brush the mixture onto the nail in desired shape or pattern. Let dry and apply top coat.
Apply nail gel on nail only where you want to apply glitter. Dust the nail with glitter and lightly shake to remove excess. Allow the gel and glitter to dry, and use a small implement to remove any glitter that you don’t want. Apply top coat.
Or cover entire nail with nail gel or polish. Dip the tips of your nails into the glitter. Allow to dry and apply top coat.
Paintings
To make leaves or flowers, take a tiny 'square' tipped brush and dip one corner into dark green, and the other corner of the brush into a lighter green, make a tick type swish stroke onto the nail. You will see that it makes what resembles leaves. Depending on how you angle the brush. Practice it on a piece of paper. If you use other colours, it will make what looks like flower petals. Practice so you know how to do it. Try changing the angle you hold the brush. You can get the 'feel' for it this way. Just make a small quick stroke with the two colours loaded onto the brush. Then you can use a tiny pointy tipped brush to add the division between leaves or outline of a flower.
You can make a more intricate flower by making larger dots with the bobby pin and using a toothpick to drag the dots into the centre.
Warnings
Some people (like me!) may be allergic to some nail products. If you experience an adverse reaction to a product, thoroughly wash your hands, use acetone to remove it, if necessary, and discontinue using the product.
Acetone and many nail polishes give off fumes and / or are flammable. Use in a well-ventilated area, and avoid fire, sparks, or smoking around these products or while they are wet on your nails.
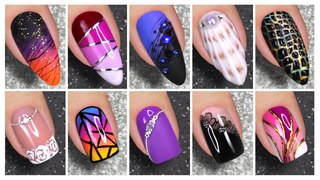
Check out this link for a video on the best nail art for 2020
https://www.youtube.com/watch?v=9If1mckU5vY
Image in main photo is from the video
Posted: Wednesday 9 June 2010