What is Sun Painting and How To Do It?
Sun Painting or Heliographic Art as its technically called is a process where transparent fabric paints are applied to fabric (100% cotton is the best.) and while the paint is still wet, objects like stencils, leafs, feathers etc are placed onto the wet fabric. You then place it in the sun and when it dries, the outlines of the objects are transferred to the fabric.
Fabric – It’s best to use 100% white cotton fabric for this process. Blends of cotton and synthetic (containing at least 50% cotton) and coloured fabrics will give you good results but the colours wont be as vibrant as they would on the 100% white cotton. You may also find that the design is not as resistant to washing either.
So how do you do it?
You need to start off by machine washing your fabric to remove any sizing, this is a starch which is used to stiffen fabrics and usually used on things like shirt collars or cuffs, it is used to add crispness to some fabrics but needs to be removed to give the tchnique a good chance of working.
Mix up all colours you want to use (2 parts water to 1 part paint) Make sure to mix enough paint ahead of time as you don’t want to run out half way through!
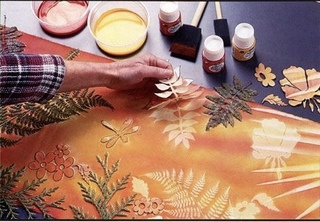
Make sure you have all your supplies ready - foam brushes, paints, salt, and any items you want to use to create designs like leaves and other natural items.
Spread fabric over a smooth waterproof board, even just covering a board with plastic wrap or a plastic drop sheet or tablecloth, you can pick these up from paint stores or even dollar stores for a couple bucks. Wet the fabric with clean water using a foam brush or spray bottle. Once wet the material should "stick" to the smooth, waterproof painting surface.
Your board should be easily taken outdoors for the sun printing to occur.
1) Apply your main colour first using a foam brush and long smooth painting strokes. Remember to leave unpainted (white) areas for the other colours.
2) Apply the second colour (complimentary colour) using a clean foam brush. If you plan to use a 3rd colour you need to remember to leave some small white spaces for them too.
3) Lastly, apply the third colour if using one. Apply it in the last white areas remaining and also in small areas on top of the other two colours.
4) Spread fabric over a smooth waterproof board and wet it with clean water using a foam brush or spray bottle. Once wet the material will "stick" to the smooth, waterproof painting surface.
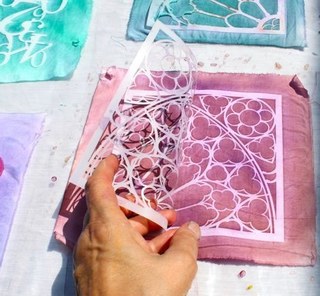
5) Once the entire piece of cotton fabric is painted, quickly arrange any patterns and natural items onto the piece of fabric.
6) With your finger you should carefully push the patterns tight against the fabric (since the fabric is wet they should almost "stick" to the surface).
7) If desired you can now place the salt onto the fabric. Simply place, toss or spread the salt onto the fabric's surface (it does not take much salt to create this effect - a few grains are sufficient!)
HELPFUL TIPS
To get your colours to blend more, apply more water to the fabric before painting. For less blending, apply less water or leave about 1/2 inch between the colours. They will move together as they spread across your wet fabric. Be sure to cover the entire surface with colour as areas remaining white will not show a design image. Normally the results are better if 2 or 3 colours are used. Too many colours however can have a not so nice effect.
Mix the paper patterns and natural items on the same piece. The two work nicely together to create depth and dimension on the painted fabric. If it is a windy day, small stones may be placed over the paper patterns (although a small mark will appear on the finished fabric where the stone was placed). Or a large piece of fencing or screening may be placed over the entire piece of fabric! It keeps everything in place and creates an interesting design as well!
Any object that will lie very flat on the painted fabric is good for sun prints. The purpose is to block out the light entirely. Objects that are not flat down of the fabric will have blurred edges.
Soft leaves such as ferns or maple leaves may be pressed or ironed between layers of paper to flatten. Stiff leaves like laurel and evergreen needles are harder to make lie perfectly flat.
Cheesecloth can be pulled into abstract shapes, grid patterns from screens or rug grabbers, laces or paper doilies all make good prints.
Designs may also be cut from cardboard or contact paper.
Other ideas are coins, rubber bands, paperclips, pens, pencils, cutlery, scissors, buttons, thread, string, dried pasta, cereal or rice, feathers, dried and pressed flowers, seashells and starfish.
Next-
1) Place your finished piece in the sun to dry. If its not a sunny day then you can try other methods like heat lamps like they use in restaurants to keep the food hot but be careful with these as they can get VERY VERY hot. Also if the weather is not cooperating the fabric may be placed in front of a large window until completely dry, the results occur more quickly if the piece can be placed directly in the sun though so it’s best to make this a last resort method. Once dry, the fabric should be treated like any piece of cotton. It is machine washable (although don’t use bleach) and can be dry cleaned.
2) The change happens quite quickly; you can watch as the sun dries the fabric and magically prints the design onto its surface! Depending on the time of year, where you are located and what the weather is like, this step can take anywhere from 15 minutes to 1 hour. You can check the progress by carefully lifting the corner of one of the paper patterns or items.
3) Once you have reached the desired effects simply remove all the patterns (natural and paper), sweep off the salt and you're done! You only need to fix the colours by ironing the fabric for 2 to 3 minutes on the cotton or hottest setting.
Other effects you can do include
Scrunching
Paint the fabric then crunch into a small bunch. Place in the sun to dry. The result is an interesting "crackled" effect on the fabric.
Tie-dye with rubber bands
After applying the paint to the fabric, secure rubber bands around various small sections. This will result in interesting circular designs with spiky lines just as you do with tie-dying.
Posted: Thursday 4 February 2010