
Most students have, at some time or another, made paper mache in art class; it's a staple art form for many schools and an inexpensive way to create and teach sculpture.
I recall a friend's class once making masks which they got to wear in a school class photo, and feeling a bit envious that my art teacher hadn't allowed us to do that!
What Exactly is Paper Mache?
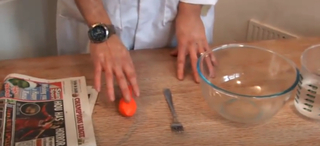
It consists of a paper mache paste and paper. The traditional method of making paper mache paste is to use a mixture of water and flour or other starch mixed to the consistency of heavy cream.
While you could use any adhesive if thinned to a similar texture, such as polyvinyl acetate-based glue such as PVA or wallpaper glue, the flour and water mixture is the most economical. First, the paper is cut or torn into strips and soaked in the paste until saturated.
The saturated pieces are then placed onto the surface of your chosen mould and allowed to dry slowly; drying in an oven can cause warping or other dimensional changes during the drying process, so it's best to air dry naturally.
Next, place the strips on or over a structural frame, or they can be placed on an object to create a cast. Oil or grease like Vaseline can be a release agent if needed. Once dried, the resulting material can be cut, sanded and painted, and waterproofed by painting with a suitable water-repelling paint.
Paper mache is one of the most versatile crafts around! There is no right or wrong way to do it. There is not even a right or wrong way to spell it, both Paper Mache or Papier Mache, you choose!
Using paper mache techniques, you can create almost anything. The best part is you have everything you need to make your masterpieces lying around your home right now.
Let's Start with the Paste:
Here are Two Simple Recipes for You
HEAT FREE PASTE
This no-cook paper mache paste recipe is a good one for kids because it is easy to make and does not require heating.
All you need is water, flour and some salt.
Mix one part flour with two parts water. You want it to be the consistency of thick glue, but you also want it to be slightly runny and not thick like a paste. Add more water or flour as necessary. Mix well to remove any lumps. Add a few tablespoons of salt to help prevent it from becoming mouldy. And if you don't like the smell of the glue mixture, you can add a few sprinkles of cinnamon or oil or cloves to sweeten it up!
COOKED PASTE
This paper mache paste recipe requires some boiling; it is a little more robust than the heat-free version and is usually a little smoother in texture.
All you need is flour and water, and salt.
Mix one part flour with five parts water. And allow heating to boil. Stir well and let it simmer for 2 - 3 minutes. It should be smooth and have the constancy of thick glue. Add more water or flour in small amounts, if necessary, until you get the desired consistency. Again add a few tablespoons of salt to help prevent it going mouldy.
Both glues can be stored in a covered bowl or jar, in the refrigerator, for a few days.
Pulp recipe for Paper Mache
Make a pulp mixture to make fine details on Paper mache projects. You can also use it to make sculptures. It works almost like clay, so it's easy to mould into shape than strips of paper. It does use a lot more paper, though, so be aware of that aspect.
You will need – Newspaper, Water, Salt and Glue
Instructions:
Tear the newspaper into tiny pieces and put them in a large bowl. Add just enough warm to hot water to cover the newspaper altogether. Let soak overnight.
Soak the newspaper overnight in water. Then add small amounts to an old blender, including the water.
TopTip: (Don't use your good blender; trust me on this! Unless you aren't planning on ever blending anything in the future, of course!). Blend until the pulp becomes smooth; add extra water if needed, but keep it cool. Add salt to stop it going mouldy and glue to make it sticky, and then store in the fridge for up to a couple of days if not using it straight away.
Alternatively, add your newspaper to boiling water and let it cook until it falls apart. Of course, you must oversee this and add extra water if necessary. Let your newspaper and hot water mixture sit for a few hours, and then put it in the blender or food processor if you want it smoother again. Remember to add the other glue and salt once your mixture is smooth!
Store your pulp in an air-tight bag or bowl in the refrigerator for up to several days.
How to Paper Mache
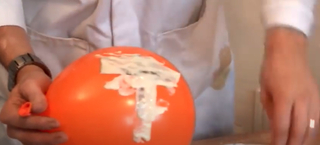
- Create your form (Balloons are good for things like masks or piñatas, for example, and then prepare your desired paste.
- Tear the newspaper into strips. The length of your paper may vary depending on the size of your project; however, you will want your strips to be about 2 to 4 cm wide.
- Dip one piece of newspaper at a time into your prepared paste. You want the newspaper strip to be saturated.
- Hold the strip over the paste bowl and run it through your fingers to squeeze off excess paste.
- Stick the newspaper strip over the form you want to paper mache and smooth it down with your fingers.
- Completely cover your creation with a layer of newspaper strips. They should all be overlapping and running in different directions.
- After applying one layer, let it dry completely. Drying can take up to 24 hours for each layer.
- Add a second layer of newspaper strips and let it dry completely.
- Repeat this process until you get the desired effect or strength you require; remember, things like piñatas need to be weak enough to break but strong enough not to break too early. So have at least three layers of Papier-mâché newspaper strips.
- Lastly, paint and decorate to finish your creation; if needed, add a coat of varnish.
Some Tips
- Tear the newspaper up into strips, don't cut it, as the torn strips will adhere and lie much smoother.
- Be generous with the paste when dipping your newspaper, as you want each piece to be thoroughly saturated!
- Let each layer dry completely before adding another.
- You can use the paper mache pulp recipe above to add extra detail or smoothness to your form before, during or after you add the paper mache layers. You can use this pulp recipe like moulding clay, too.
Click on the video below to see how easy paper mache is
Interested in other art crafts? Take a look at Mosiacs